July 20, 2011

World Peace Cookies

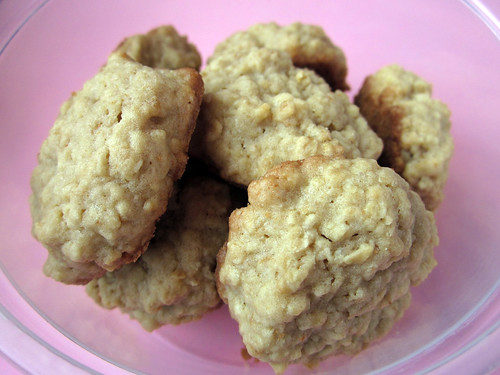
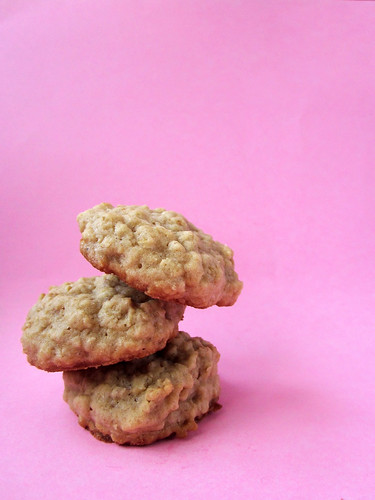
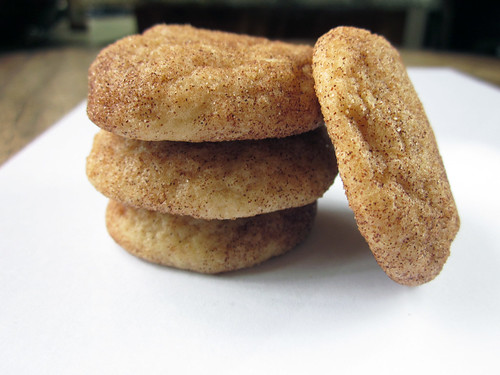
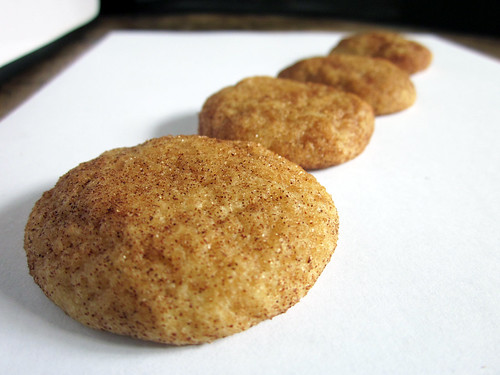
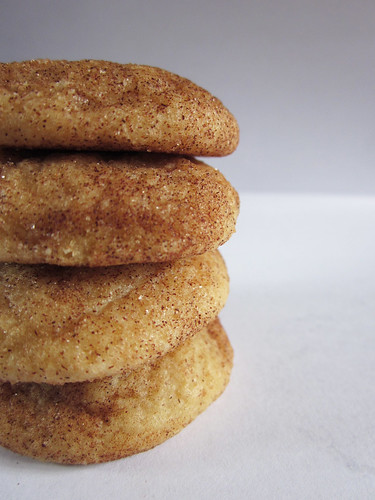
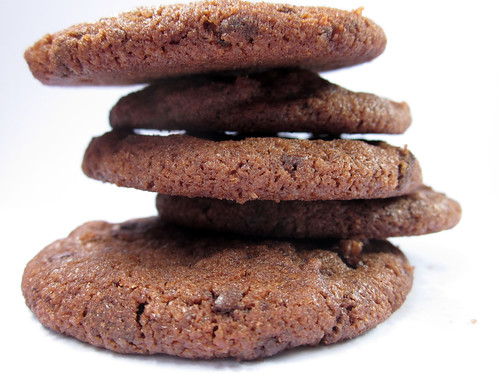
*tap tap* Is this thing on? I'm baaack. Heh. After four months of not posting, I'm back with cookies. Not just any cookie, it's Dorie Greenspan's World Peace Cookies!


IMG_4064.2


Since I've been missing for a such a long time, I feel like I should tell you what I've been up to:

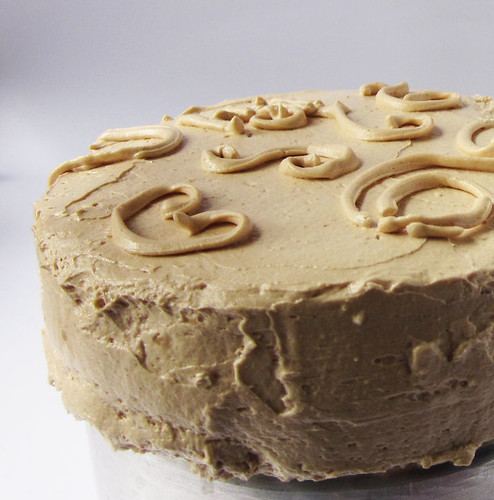
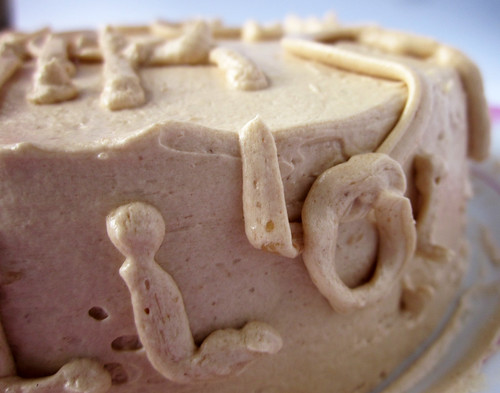
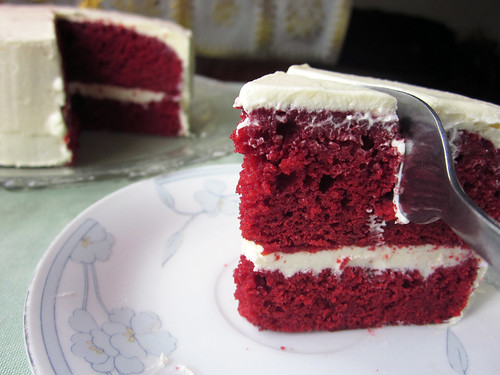
-I made a promise to myself to make cakes for all my friends' birthdays since cakes are pretty much a requirement in any birthday. Bonus points if it's homemade. So far, three of them celebrated their birthdays and two of them have already appeared on this blog and the other one, I forgot to take pictures. I'll recreate it sometime and I'll post it here.

-I'm a senior now. Woot! Just one more year of exams and studying hard then I'll be taking the CPA board exams. Well, I'll be reviewing for six months first. But after that, board exams! :o

-Does anyone know how I could learn French? Other than go take a class. I don't think there's one near my area. Maybe books or websites? Thanks.

-I don't know what to say anymore. For four months, I didn't post anything and that's the only thing new that's happened. My life is riveting.


IMG_4063.2


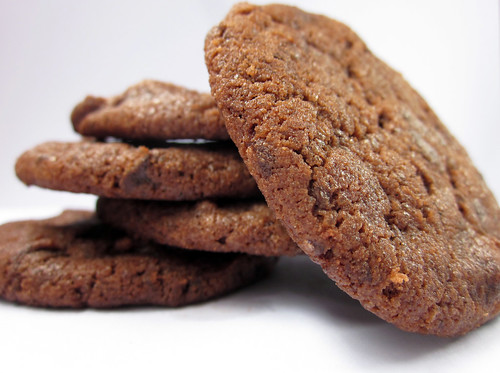
Anyway back to the cookies. I know this has been on the internets plenty of times and you probably don't need convincing to make these cookies or probably you have made them too. But I am in love with them. Deeply chocolate-y but I don't get sick even if I eat the whole batch. Not that that's ever happened before. Not me. I have amaaazing self-control.


World Peace Cookies
From Baking: From My Home to Yours, by Dorie Greenspan
Yield: About 36 cookies (I get 24 exactly, every time)

1 1/4 cups all-purpose flour
1/3 cup unsweetened cocoa powder
1/2 teaspoon baking soda
1 stick plus 3 tablespoons (11 tablespoons) unsalted butter, at room temperature
2/3 cup (packed) light brown sugar
1/4 cup sugar
1/2 teaspoon fleur de sel or 1/4 teaspoon fine sea salt
1 teaspoon vanilla extract
5 ounces bittersweet chocolate, chopped into chips, or a generous 3/4 cup store-bought mini chocolate chips

Sift the flour, cocoa and baking soda together.

Working with a stand mixer, preferably fitted with a paddle attachment, or with a hand mixer in a large bowl, beat the butter on medium speed until soft and creamy. Add both sugars, the salt and vanilla extract and beat for 2 minutes more.

Turn off the mixer. Pour in the flour, drape a kitchen towel over the stand mixer to protect yourself and your kitchen from flying flour and pulse the mixer at low speed about 5 times, a second or two each time. Take a peek — if there is still a lot of flour on the surface of the dough, pulse a couple of times more; if not, remove the towel. Continuing at low speed, mix for about 30 seconds more, just until the flour disappears into the dough — for the best texture, work the dough as little as possible once the flour is added, and don’t be concerned if the dough looks a little crumbly. Toss in the chocolate pieces and mix only to incorporate.

Turn the dough out onto a work surface, gather it together and divide it in half. Working with one half at a time, shape the dough into logs that are 1 1/2 inches in diameter. Wrap the logs in plastic wrap and refrigerate them for at least 3 hours. (The dough can be refrigerated for up to 3 days or frozen for up to 2 months. If you’ve frozen the dough, you needn’t defrost it before baking — just slice the logs into cookies and bake the cookies 1 minute longer.)

GETTING READY TO BAKE:
Center a rack in the oven and preheat the oven to 325 degrees F. Line two baking sheets with parchment or silicone mats.

Working with a sharp thin knife, slice the logs into rounds that are 1/2 inch thick. (The rounds are likely to crack as you’re cutting them — don’t be concerned, just squeeze the bits back onto each cookie.) Arrange the rounds on the baking sheets, leaving about 1 inch between them.

Bake the cookies one sheet at a time for 12 minutes — they won’t look done, nor will they be firm, but that’s just the way they should be. Transfer the baking sheet to a cooling rack and let the cookies rest until they are only just warm, at which point you can serve them or let them reach room temperature.

SERVING:
The cookies can be eaten when they are warm or at room temperature — I prefer them at room temperature, when the textural difference between the crumbly cookie and the chocolate bits is greatest — and are best suited to cold milk or hot coffee.

STORING:
Packed airtight, cookies will keep at room temperature for up to 3 days; they can be frozen for up to 2 months.

March 27, 2011

Banana Muffin

IMG_2977.2


Bananas are the cheapest fruit and the most ubiquitous fruit here so it's no surprise that our house is stocked with it all the time. My younger brother loves it so much that when I want to make banana bread there's always none left.

When I saw that there's a bunch of bananas on our table today, I asked my brother to pick out three and don't eat them so I can make banana bread. He loves anything banana so he was ecstatic and gladly did as he was told.


IMG_2968.2


Personally, I don't like bananas very much. I'd take one occasionally and eat half and give the other half to my brother. But I'd happily eat this. It's sweet and moist with just the right amount of banana flavor. It also doesn't have this weird after taste that I don't like about the actual fruit.


IMG_2967.2


Elise’s Banana Bread
Makes 12 muffins

This recipe calls for 3 or 4 bananas but I like to use 3. Four makes it taste too banana-ey. If you're into that, use four. I was also out of butter *gasp* so I used oil.

3 or 4 ripe bananas, smashed
1/3 cup butter, melted
1 cup sugar (can be reduced to 3/4 cup)
1 egg, beaten
1 tsp vanilla extract
1 tsp baking soda
Pinch of salt
1/2 tsp cinnamon (optional)
1 1/2 cups all purpose flour

Preheat the oven to 350 degrees and butter a muffin pan. Mix the bananas and butter with a wooden spoon in a large bowl. Mix in the sugar, egg, and vanilla until combined, then the baking soda, cinnamon and salt. Gently add the flour, being careful not to overmix. Pour into the pan. Bake for 15 - 20 minutes or until a toothpick comes out clean. Let the banana bread cool 10 minutes in the pan before turning out onto a rack and cooling completely.

March 17, 2011

Mocha Chiffon Cake a la Goldilocks

12


Goldilocks is the most popular bakeshop chain here in the Philippines. When I was younger, birthdays were not complete if a Goldilocks cake was not present. Their cakes were soft and the frosting was just really good. But these past years their cakes became dry and the frosting greasy. They probably replaced the butter with shortening to reduce costs and keep it affordable.

You can imagine my excitement when I saw the Goldilocks mocha cake recipe on Gourmeted. It took me two tries but finally the cake turned out fluffy and soft. But my favorite part was the frosting. I used my favorite vanilla frosting and added almond extract, cocoa powder and instant coffee granules.

I don't know why my first cake turned hard but here's what I did differently:
- the pans were lined with parchment but the sides were ungreased
- oven temperature at 350F
- folded (is that a word?) the eggwhites more carefully as to not deflate it

I'm not sure how this compares to a Goldilocks cake since it's been years since I last ate one. But my family and friends enjoyed eating this very much. That's good enough for me.


IMG_2664.2


There was leftover frosting and I already ate unhealthy amounts of it so I just tried to practice piping. It's okay, you can laugh at my piping attempts. Haha.


Mocha Cake ala Goldilocks
Makes 1 9-inch cake

6 large egg yolks, at room temperature
1 cup sugar
1 teaspoon coffee/espresso granules [Nescafe instant coffee recommended]
1 teaspoon cocoa powder
1 teaspoon vanilla
1 teaspoon water
½ cup canola oil
1 cup cake flour
1 teaspoon baking powder
6 egg whites, at room temperature
1 teaspoon cream of tartar

1. Preheat oven to 350°F with racks in the upper middle and lower middle positions. Spray two 9”x2” round cake pans with baking spray, and line the bottom and sides with parchment paper.
2. Whisk together egg yolks and sugar in a large bowl (or bowl of a stand mixer) over low, then medium speed, until creamy and light yellow in color.
3. Dissolve espresso or coffee granules and cocoa powder in water and vanilla in a small bowl, getting rid of lumps while stirring. Pour into the egg-sugar mixture, along with canola oil, and beat until well combined.
4. Remove large bowl from stand mixer (if using one) and sift cake flour and baking powder over it. Stir with a wooden spoon until well blended, scraping the sides of the bowl once.
5. Whisk egg whites and cream of tartar into stiff peaks in a medium bowl, and fold into the mocha batter, a dollop or two first to liquefy the thick batter, and then in thirds.
6. Divide the batter between two cake pans and place each pan on a baking sheet. Bake on two racks for 20 to 25 minutes, rotating the pans and exchanging the pans between racks halfway through. The cake is done when the tops become golden brown and the cake tester comes out clean when inserted in the middle.
7. Cool on a wire rack for 10 minutes, then carefully turn over on the wire rack, right side up. Cool completely before icing.


That’s the Best Frosting I’ve Ever Had
Adapted From Tasty Kitchen

5 Tablespoons Flour
1 cup Milk
1 cup Butter
1 cup Granulated Sugar (not Powdered Sugar!)
1 teaspoon cocoa powder
1 teaspoon coffee granules
1 teaspoon water
1/4-1/2 teaspoon almond extract (I use 1/2 but this could be too strong for some people so taste before adding more)

In a small saucepan, whisk flour into milk and heat, stirring constantly, until it thickens. You want it to be very thick, thicker than cake mix, more like a brownie mix is. Remove from heat and let it cool to room temperature. It must be completely cool before you use it in the next step.
While the mixture is cooling, cream the butter and sugar together until light and fluffy. You don’t want any sugar graininess left. Then add the completely cooled milk/flour/vanilla mixture and beat the living daylights out of it. If it looks separated, you haven’t beaten it enough! Beat it until it all combines and resembles whipped cream.
Dissolve espresso or coffee granules and cocoa powder in water and almond extract in a small bowl, getting rid of lumps while stirring. Add to the frosting and beat until blended.

March 7, 2011

Brown Sugar Oatmeal Cookies

IMG_2644.2


I love cookies. I love making them and I love eating them. When a batch is baking in the oven and I'm scooping cookies for the next, I always feel like I'm on a mission or something. I have to do it fast enough that when the cookies are finished baking the next batch is ready to go in. If not, I feel like everything in my life will go wrong. Does anyone else to this?

Anyway, among all the cookies I've baked, this is the favorite of my friends. They're always asking me to bring Oatmeal Cookies. It's chewy and soft plus all the brown sugar just makes it so tasty. Annnd if you make it with half whole wheat flour it's kinda healthy.


IMG_2648.2


We're out of whole wheat flour and I used quick-cooking oats instead of rolled and the cookies are still wonderful. I made about 5 dozen cookies.

Brown Sugar Oatmeal Cookies
Makes 4 1/2 dozen cookies

1 3/4 cups packed brown sugar
1 cup butter or margarine, softened
1 teaspoon vanilla
2 eggs
1 cup all-purpose flour
1 cup whole wheat flour
1 teaspoon baking powder
3 cups old-fashioned oats

Heat oven to 350°F. In large bowl, beat brown sugar and butter with electric mixer on medium speed, scraping bowl occasionally, until light and fluffy. Beat in vanilla and eggs until well blended.

On low speed, beat in all-purpose flour, whole wheat flour and baking powder, scraping bowl occasionally, until well combined. Stir in oats.

On ungreased cookie sheets, drop dough by heaping tablespoonfuls 2 inches apart. Flatten cookies to about 1/2-inch thickness.

Bake 12 to 14 minutes or until light golden brown. Cool 1 minute; remove from cookie sheets to cooling racks.

March 1, 2011

Blueberry Cheesecake

IMG_2269.2


It was my grandmother's 67th birthday yesterday. Instead of making a layer cake, I made cheesecake for her. Since last year she had been asking me to make it. But I kept procrastinating since I'm such a lazy busy person.

My grandmother was so cute when she saw me baking it yesterday morning. She thought that I forgot to make it because when she returned home I was out buying ingredients. She had the impression that I was already at school. When I returned with the ingredients, she got so excited that she was getting her cheesecake after all.


IMG_2292.2


Random: Mama, I love you so much. I know I don't tell you this enough. I'm really thankful for having you in my life, I know that sometimes we get on each other's nerves but that doesn't mean that that changes how much you mean to me. Happy birthday!


IMG_2302.2


This cheesecake recipe couldn't be easier. Just combine the ingredients and you're ready to go. Just make sure that all ingredients are at room temperature so there are no lumps.

For a recipe so simple, the results are amazing. And with the blueberry topping, it just takes it to a whole new level of amazing-ness.

I used canned blueberry topping for these since blueberries are hard to come by in this country.


IMG_2311.2


Simply Sinful Cheesecake
Makes 24 mini cheesecakes

2 cups crushed graham cracker crumbs
1/4 cup sugar (I used brown sugar. I was out of white.)
1/2 cup margarine or butter, melted
2 (8-oz.) packages cream cheese, softened
1 (325 ml) can condensed milk
3 eggs
juice of 2 calamansi or 2 tsps. lemon juice (if available)

Preheat oven to 300ºF. Combine crumbs, sugar and margarine; press firmly on bottom of 9-inch springform pan. Bake for 10 minutes. Set aside.
With mixer, beat cream cheese in large bowl until fluffy. Gradually beat in condensed milk until smooth. Add eggs and calamansi or lemon juice. Mix well.
Pour into prepared pan — it doesn’t matter if crust is still warm. Bake 50 to 55 minutes or until center is slightly jiggly but perimeter is set. (It took 20 mins. for these mini ones)
Cool 1 hour. Chill at least 4 hours to let flavors develop. Will keep in refrigerator for two weeks (but do you really think it will last that long?)


IMG_2304.2


February 18, 2011

White Cupcakes with Vanilla Frosting

IMG_1887.2


Taking pictures for this blog can be an adventure. First off, I use a point-and-shoot camera. It's not really that bad. What's hard is finding a good spot in our house that has a lot of natural light.

Yesterday, I baked white cupcakes with vanilla frosting. It was a bit cloudy and the light present was less than ideal. All my pictures were dark. So I decided to head out to the garage and take pictures there. I also brought a piece of bond paper to serve as my background. Cute craft papers is something I should really buy.


IMG_1901.2


Most of the time, my picture-taking skillz are non-existent. A lot of things that are not supposed to be in the shot is included. Sometimes my hand makes a guest appearance and then an otherwise good shot is ruined. I'm still practicing and I'm hoping that practice does really make you better.


IMG_1903.2


But what I didn't expect when I took these pictures was our dogs wanting to eat the cupcakes. It become hard to take shots of cupcakes while trying to fend off hungry dogs so I called for reinforcements. My sister came and distracted the dogs while I quickly took pictures.

The brown one is Kokoy (don't ask me about the name, I don't know either) and the other is Bobby. Bobby was not that really interested in the food he just wanted to be held. Kokoy, on the other hand, was a crazy one. He did everything to get to eat the cupcakes. He was jumping, running and escaping from my sister so I also needed to be on guard most of the time.

In the end, though, the cupcakes made it without any casualties.


IMG_1907.2


My cupcakes turned out dense. It's not really the recipe's fault. I was being stupid and used a way too small bowl for four eggwhites. The top part was already at stiff peaks but when I was ready to fold it into the batter it was still liquid at the bottom. I didn't want to wash the beaters again so I just left it as is. The cupcake still tasted delicious though.

Oh, about the 200 cupcakes and 200 cookies we baked, as you can see, I'm still alive :o I'm really grateful for my cousins' help because otherwise I would've gone crazy. And it also helped that I pre-measured the dry ingredients during the week.


IMG_1905.2


Snow White Vanilla Birthday Cake

Ingredients:

1/2 cup butter
2 cups white sugar
3 1/2 cups flour
1 teaspoon salt
3 teaspoons baking powder
1 1/2 cups ice water
1 teaspoon vanilla
1/2 teaspoon almond extract
4 egg whites beaten stiff

Method:

Add sugar to the butter and beat until light. Sift dry ingredients and add alternately with ice water and flavourings, beating thoroughly after each addition. Fold in the beaten egg whites. Pour into greased layer pans and bake at 350 degrees for about 20 minutes.

That’s the Best Frosting I’ve Ever Had (I halved this)

5 Tablespoons Flour
1 cup Milk
1 teaspoon Vanilla
1 cup Butter
1 cup Granulated Sugar (not Powdered Sugar!)

In a small saucepan, whisk flour into milk and heat, stirring constantly, until it thickens. You want it to be very thick, thicker than cake mix, more like a brownie mix is. Remove from heat and let it cool to room temperature. It must be completely cool before you use it in the next step. Stir in vanilla.
While the mixture is cooling, cream the butter and sugar together until light and fluffy. You don’t want any sugar graininess left. Then add the completely cooled milk/flour/vanilla mixture and beat the living daylights out of it. If it looks separated, you haven’t beaten it enough! Beat it until it all combines and resembles whipped cream.

February 5, 2011

200 Cupcakes

My cousin and I are making 200 red velvet cupcakes to sell at her school on Valentine's Day. Any tips? I actually think that it's pretty manageable. But I might not be wrong about what I'm getting into. So if you experienced being crazy enough to make 200 or more cupcakes in one go, tips on how to do it is very much appreciated :)

February 3, 2011

Red Velvet Cake

IMG_1319.2


I think Red Velvet is a really weird flavor. It has a hint of chocolate but you can't consider it a chocolate cake. But it's not vanilla either. And with the buttermilk and vinegar added the batter kinda smells sour to me. Plus it's red.


IMG_1346.2


But it's really, really delicious. It's seriously one of my favorite cakes now. The cake itself is so moist and not that sweet that I feel like I can eat half the cake in one sitting. The cocoa taste is not that empowering but you can certainly tell that it's there. And the frosting is just perfect. It complements the cake beautifully and it's not very sweet too. I'm a big fan of desserts that are not very sweet, can you tell?

Aside from the taste, the other thing I love about Red Velvet is the appearance. When you look from the outside it looks blah. The white frosting just doesn't excite me as much as chocolate or even pink buttercream. Then when you cut into the cake and see the red cake, it's just striking.

I guess I shouldn't judge cakes too quickly.


IMG_1328.2


Valentine's Day is just around the corner. Have you planned anything special yet? If no, make a cake. Cake is good. Red cake is better.


IMG_1341.2


For the cake, I halved this recipe and baked it in two 6-inch pans. Same for the frosting. Just enough for you and your loved one for Valentine's. If you're shy about eating a lot of cake there's gonna be leftovers.

Red Velvet Cake
Makes a 9-inch cake

2 1/2 cups all purpose flour
2 cups sugar
1 Tablespoon cocoa (I use two)
1 teaspoon salt
1 teaspoon baking soda
2 eggs
1 1/2 cups oil
1 cup buttermilk
1 Tablespoon vinegar
1 teaspoon vanilla
2 oz. red food coloring (I use 1 oz.)

Preheat oven to 350 degrees.
Grease and flour two 8 inch cake pans.
Lightly stir eggs in a medium bowl with a wire whisk. Add remaining liquid ingredients and stir together with whisk until blended. Set aside.
Place all the dry ingredients in your mixing bowl and stir together really good with another wire whisk.
Add wet ingredients to the dry ingredients and mix on medium-high for about a minute or until completely combined.
Pour into cake pans and then drop the pans on the counter a few times to release any air bubbles.
Bake for about 30 minutes or until a toothpick inserted comes out clean.
After about ten minutes, remove from pans and cool completely on a wire rack. I also cover in plastic wrap while the cakes cool.
Then make the frosting.

That’s the Best Frosting I’ve Ever Had

5 Tablespoons Flour
1 cup Milk
1 teaspoon Vanilla
1 cup Butter
1 cup Granulated Sugar (not Powdered Sugar!)

Bake your favorite chocolate cake and let it cool.
In a small saucepan, whisk flour into milk and heat, stirring constantly, until it thickens. You want it to be very thick, thicker than cake mix, more like a brownie mix is. Remove from heat and let it cool to room temperature. (If I’m in a hurry, I place the saucepan over ice in the sink for about 10 minutes or so until the mixture cools.) It must be completely cool before you use it in the next step. Stir in vanilla.
While the mixture is cooling, cream the butter and sugar together until light and fluffy. You don’t want any sugar graininess left. Then add the completely cooled milk/flour/vanilla mixture and beat the living daylights out of it. If it looks separated, you haven’t beaten it enough! Beat it until it all combines and resembles whipped cream.
Grab a spoon and taste this wonderful goodness. If there is any left after your taste test, spread it on a cooled chocolate/red velvet cake.


IMG_1342.2
P.S. This is my first layer cake! I'm such a noob.

January 27, 2011

Snickerdoodles

IMG_1181.2


It was already noon and I was rushing for the cookies to cool. I woke up early to have enough time to bake, cool and pack the cookies. But in between reading the newspaper, eating breakfast, calling the theater and basically procrastinating, I ended up rushing to finish the cookies. Time management is just not my forte.

My siblings and I were going to watch Harry Potter and the Deathly Hallows Part 1. It was the very first Harry Potter movie I was going to watch so I was eager to watch it. I just finished reading the books last year. I know, I'm very late in joining the HP Bandwagon.


IMG_1207.2


Fortunately, we managed to get to the theater in time. We bought our tickets and settled in our seats. Snickerdoodles were the only kind of cookie that I brought. I was planning to bake more but I ran out of time. I have to say, they weren't missed.

Together with the cookies we brought a liter of apple-flavored green tea. It's this bottled drink that's sweetened with honey and meant to be drank cold. Apple and cinnamon are definitely a good combination. The green tea was in my sister's bag and the cookies were in mine then we covered them with the rest of our stuff. I'm not sure if bringing food inside the theaters was allowed but I certainly did not want to pay for their overpriced food. We managed to smuggle it in without problems though. Yes, I'm a smuggler now! Unless bringing food is allowed then that just means that we went to all that trouble for nothing.


IMG_1194.2


I love these cookies. They're so soft and full of cinnamon-y goodness. It just melts in my mouth when I bite into it. I've brought this to school once and my friends enjoyed it very much. I wasn't sure at first if they would like it since cinnamon is not a very common flavor here. It's mostly chocolate, vanilla and mocha.

My brother also brought some to school with him and two of his classmates wanted to buy these cookies. It's that good.


IMG_1184.2


Snickerdoodles

I baked my cookies for 11 minutes at 300F and these are smaller than the recipe states. I used a tablespoon of dough and made 28 cookies.

1/2 cup butter (1 stick), softened
1/2 cup granulated sugar
1/3 cup brown sugar
1 egg
1/2 teaspoon vanilla
1 1/2 cups flour
1/4 teaspoon salt
1/2 teaspoon baking soda
1/4 teaspoon cream of tartar
For rolling:
2 tablespoons granulated sugar
1 teaspoon cinnamon

1. In a large bowl, cream together the butter and sugars with an electric mixer on high speed. Add the egg and vanilla and beat until smooth.

2. In another bowl, combine the flour, salt, baking soda, and cream of tartar.

3. Pour the dry ingredients into the wet ingredients and mix well.

4. Preheat oven to 300 degrees while you let the dough rest for 30 to 60 minutes in the refrigerator. [I preheat the oven when I'm rolling the cookies.]

5. In a small bowl, combine the sugar with the cinnamon for the topping.

6. Take about 2 1/2 tablespoons of the dough and roll it into a ball. Roll this dough in the cinnamon/sugar mixture and press it onto an ungreased cookie sheet. Repeat for the remaining cookies.

7. Bake the cookies for 12 to 14 minutes and no more. The cookies may seem undercooked, but will continue to develop after they are removed from the oven. When the cookies have cooled they should be soft and chewy in the middle.

Makes 16 to 18 cookies.


IMG_1195.2
I love this picture. It looks like the cookies are going to start speaking.

January 21, 2011

S'mores

IMG_1058.2


Believe it or not, I first ate s'mores only this year. Growing up, our house was not stocked with a lot of junk foods. Chocolate bars were only available when relatives from abroad come home and bring bags of chocolate. Also, it didn't help that s'mores were only some food I see on cartoons.

When my uncle came home from the US, he gave us some Hershey's bars so I bought marshmallows and graham crackers. I roasted the marshmallows on the stovetop and placed it on top of the waiting graham and chocolate. I placed another piece of graham and squished the whole thing. The marshmallow released all this gooey goodness. It was so good!


IMG_1057.2


This time though, I didn't roast the marshmallows, I microwave them instead. I used Meiji Black instead of Hershey's. I have to say, the dark chocolate tastes so much better. It cuts the sweetness of the other elements of the s'mores.

I also used all store-bought ingredients. If it tasted this good without using homemade stuff, I can't imagine what it will taste like if I made my own graham crackers and marshmallows. It will probably blow my freakin' mind! (For all How I Met Your Mother fans out there ;) )


IMG_1051.3
Vampire S'mores!


Oh, wait. Introductions! I'm Marie from the Philippines. I'm eighteen years old majoring in Accounting. I love to bake in my spare time. Hello, world!